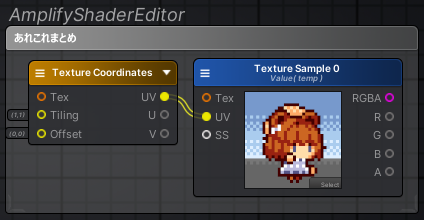
概要
UnityのBuild-in環境でAmplifyShaderを使ってる際に、気付いた事や困った事、聞いたり調べた内容を載せます。情報が正しくない可能性もあるかも
基本系
インストールしたけど何から手を付ければいいかわからない!
以下私的参考
- 以下を見る
- サンプルを確認する
- ASEを入れた後、ProjectウィンドウでAssets/AmplifyShaderEditor/Examples/を確認
- Built-In Samples.unitypackageをダブルクリックで実行してサンプルをインストール
- Assets/AmplifyShaderEditor/Examples/Built-In/内にあるフォルダ片っ端からシーンを開いていじって試してみる
- いじった後に元に戻したい場合は、またBuilt-In Samples.unitypackageを実行すればOK
調べたいけどなかなか情報が出てこない!
日本語の資料はほんとない…以下を翻訳して探してくる感じ
- Amplify Creations Wiki
- Discordとか公式リンク -> Amplify Creations » DiscordLink
- そのた英語でググって出てきたフォーラムサイト
操作系
コメントを使いたい
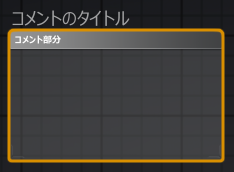
ウィンドウ内で”C”キーを押す
ノードを出すためのショートカットキーが効かない?
キーを押しながらクリックで出す必要がある。
Add なら A を押しながらクリック。
Floatなどで値を操作できるバーを出したい
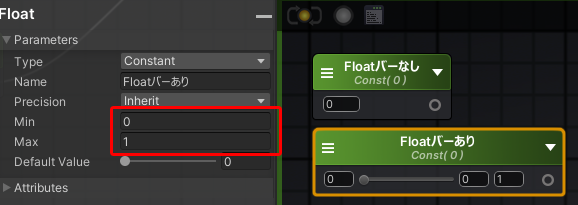
Min,Maxに値を入れると出てくる
Unity上のInspectorで値を入力できるようにしたい
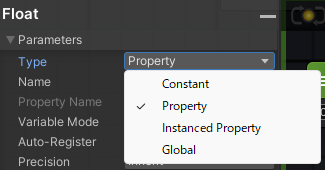
Parameters の Type を PropertyにすればOK
OutPut内の値をInspectorで操作したい
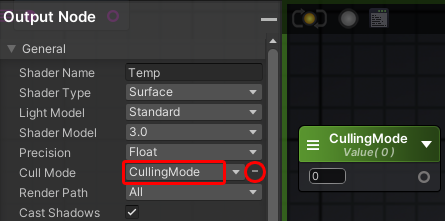
- ノードを作って上記のようにPropertyにする
- 該当の項目の右側の●を押す
- 作ったノードの名前を指定する
※場合によってはAttributesのAuto-Registerにチェックを入れないと、Insplectorに出てこないことも
Vector2をPropertyにするとInspectorに4つ項目が出てしまう(減らしたい)

仕様みたい。Vector3も同様
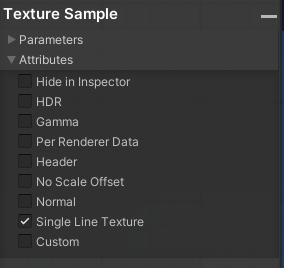
InspectorにTextureのTilingとOffsetの入力欄を出したくない


TextureSampleのAttributesから Single Line Texture にチェックを入れるとテクスチャー参照だけになる
InspectorにMinとMax調整用のバーを出したい

Node(Vector2)のAttributesから Remap Slider にチェックを入れる
Inspectorの項目を並び替えたい、整理したい
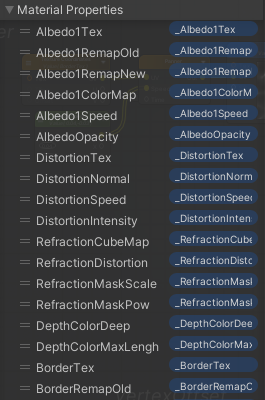
Out PutのMaterial Propertiesをドラッグすると入れ替えられる。
見出し(Header)の文字が欲しい場合は、各NodeのAttributesのHeaderにチェックを入れて入力欄に文字を入れる。
Unity上のSceneビューでUVスクロールなどを再生して確認したい
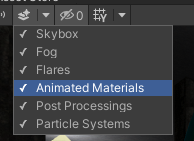
SceneのメニューからAnimated Materialsにチェックを入れれば再生される
ShaderEditorで編集した内容を即時Scene上に適用させたい
Shaderではなく適用させているMaterialそのものをShaderEditorで開く。追加済みのパラメーターはすぐ画面に反映される。新規追加のものは一回保存する必要あり。
編集しているShader/MaterialがProjectのどこにあるか分からなくなった!
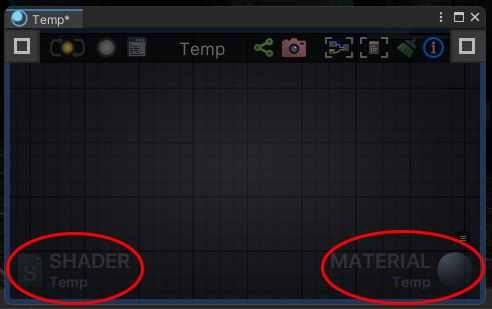
Editor下部にある SHADER or MATERIAL をクリックするとProjectウィンドウで選択してくれる
他人にノード一式を共有したい
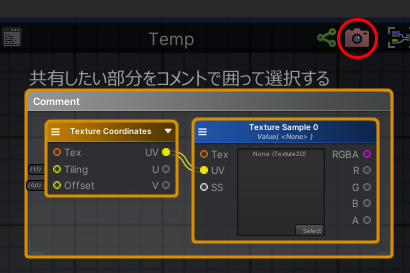
- コメント内に共有したいノードを入れる
- コメントごと全部選択する
- 上のバーにあるカメラをクリックする
- リンクがコピーされるので共有したい人にそのリンクを渡す
- 渡された人は、Shader Editor 上でペーストする
※どこかの鯖にアップされるので企業内では要注意
Node詳細、内容系
とりあえずエフェクト用に加算合成させたい
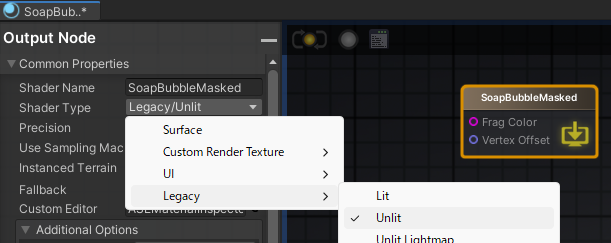
OutPutNodeを以下にする
- CommonProperties を Legacy / Unlit に
- Flag Color(色)とVertex Offset(頂点変更)だけになって軽くなる
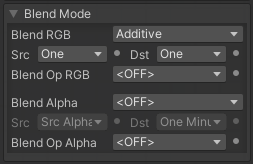
- SubShader の Blend Mode の Blend RGB をAddtive にする
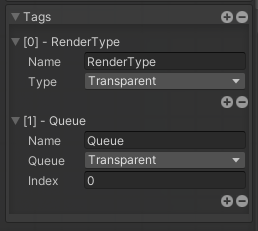
- SubShader の Tags を 編集/追加 にする
- RenderType を Transparent に
- Queue を Transparent に
- MaterialのInspectorのRenderQueueの項目が、Transparent/3000とかになるはず
- 低いと背景などより先に描画されて、加算の後ろが描画されない(透けてしまう)
加算合成にしているのに黒色が出る
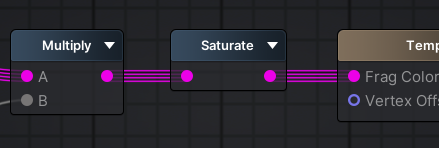
RGBの計算結果がマイナスで、それを加算して結果的に黒くなってる可能性がある。
Saturateとかをかけて0~1内にすると治るかも
Photoshopで言うレベル補正をかけたい
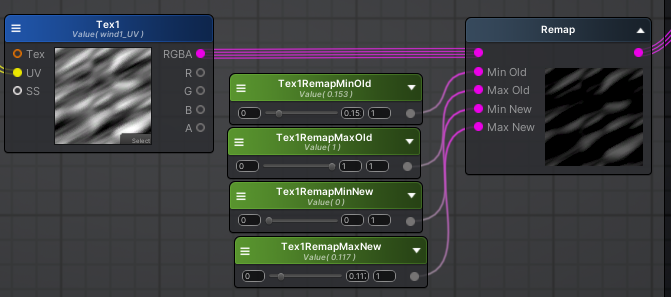
私はRemapでやりました。値が0~1よりはみ出ることもあるのでSaturateを忘れずに…
グラデーションマップ(Photoshop) or コロラマ(AfterEffects)をかけたい
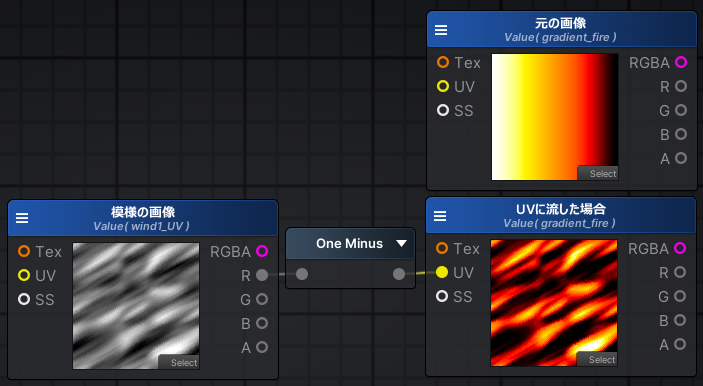
デフォルトで用意されているグラデーション(Gradient)はプロパティにできないっぽい。
私は256×4の画像を作ってUVに充てた。色の度合い(どの範囲の色合いを出すか)は前述のRemapで調整。※右が明るくて左が暗いマップの場合、One Minusは必要なし
フチをとりたい(リムライト的な)
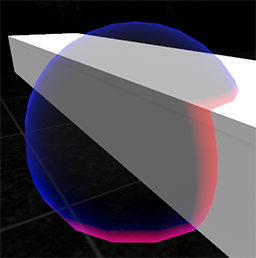
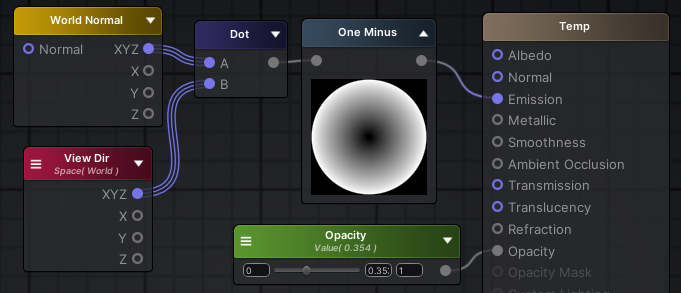
WorldNormalとViewDirをDotにさせてよしなに
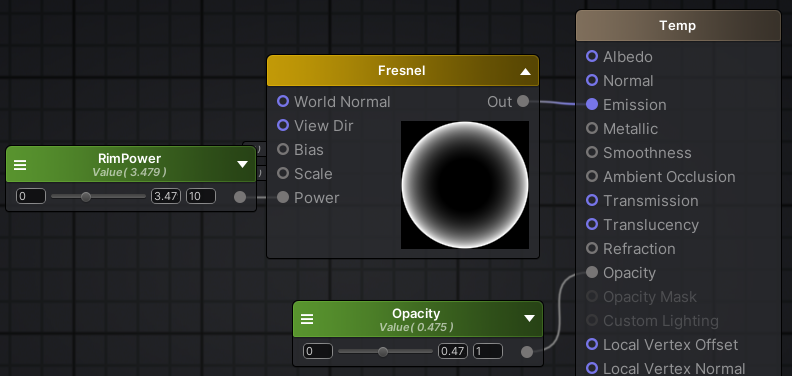
またはFresnelを使う
接地面を取りたい!(Intersection)

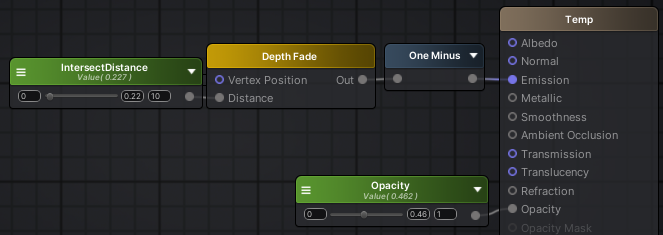
- DepthFade(奥のポリゴンとの距離)を使う。
- CameraのDepthTextureModeをDepthにして深度をとれるようにする
- VRChatでは上記プロパティを変えても変化がない
- Cast ShadowsをOnにしたGameObjectとMaterialと、
SyadowTypeが”NoShadows”以外になっているLightが必要
- Cast ShadowsをOnにしたGameObjectとMaterialと、
VertexPositionが特定の位置/角度で白飛びする
Sceneビューでは問題ないが、Gameビューで起きる問題。マテリアルのInspector下部にある”Enable GPU Instancing”にチェックを入れることで解決するかもしれない…
なぜこうなるか不明。同じ要因でVertexPositionをVertexOffSetにつないでいる場合、見えなくなる(どこか遠くへ吹っ飛んでたり)
球をどの角度から見ても同じUVになるようにしたい
UVだけBillboardみたくしたい場合

World NormalからTransform Direction(World to View)に繋ぐだけ。
※Vertex Normalから繋ぐとTransformのRotationによって角度が変わる様になる。
※ComponentMaskは見た目を分かりやすく為だけに使用。
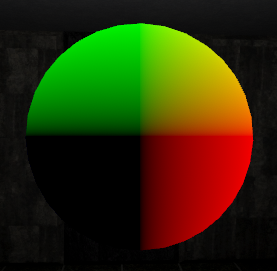
どの角度から見ても↑の状態になる
ParticleSystemのColorを適用したい
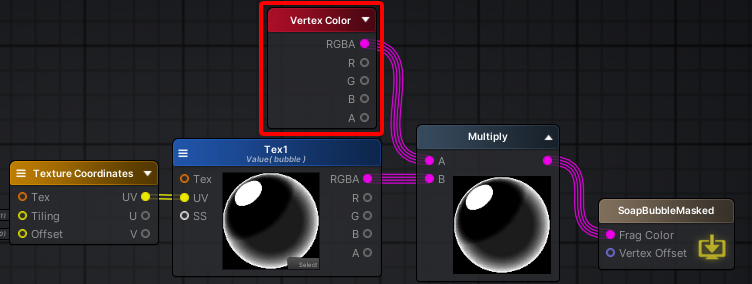
Color over Lifetimeで透過度をいじっても変化がない場合はコレが原因。
ParticleSystemのColorは頂点カラーなのでVertexColorを適用させればOK
Particleから特定の値/パラメーターを受け取ってコネコネしたい
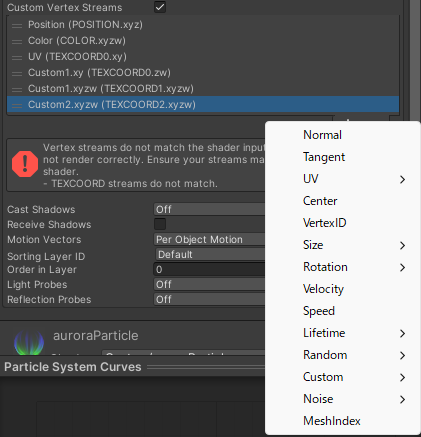
特定のタイミングで透過度やら適用度やらUV位置を変えたい際になどに。
CustomVertexStreamsを使う。
自分がざっくり理解している原理は以下
- ParticleSystemのInspectorにあるRenderer内のCustomVertexStreamsにて、
指定した情報 TEXCOORD(0~3).xyzw の枠内の情報をShaderに送ることができる - AmplifyShaderEditorでは VertexTexcoord のUV Channel(0~3)のxyzwで受け取る形になる
- 大抵 TEXCOORD0.xy はUVに使っているので、実際に使えるのは TEXCOORD0.zw~ 以降
- 受け取る側はVertexTexcoordのUV0のzw以降の値になる
- 送るパラメーターは、ユーザー定義のCustomDataの他、結構いろんな種類がある
- 送るパラメーターの順番をズラすと、渡す際のTEXCOORDの形も変わってしまう。困る
ParticleでVertexPositionを使うとヘンになる
Particleでは個々の頂点は取得できない模様。
取りたい場合は、CustomVertexStreamsでCenterをShaderに渡して、相対的な位置をコネコネする必要がある。※具体的なノードはRotationが取れなくて検証中…
ParticleでVertexOffsetの影響が小さい/大きい
Particleでは、個々の”Size”の値をもとに影響値を補正させる必要がある。
Sizeを200とかにした際に頂点が全然うごいてなかったらコレのせい。

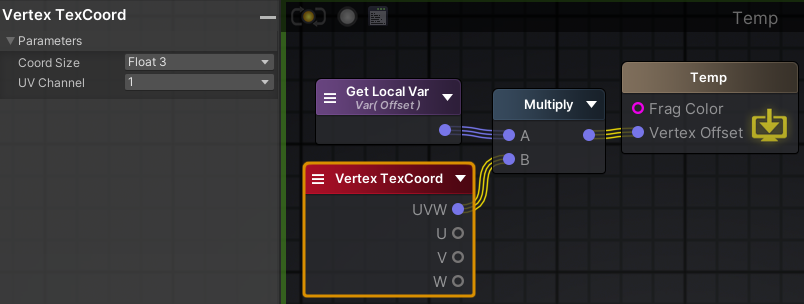
- Particleの CustomVertexStreams で Size.xyz を送るようにする
- Shader側はVertexTexCoordでその値を受け取る
- VertexOffsetにその値を掛ける
Tween的なイージング(EaseIn/EaseOut)をかけたい
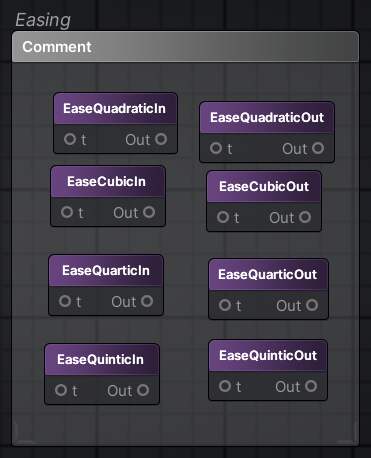
CustomExpressionを使いました。
結果がShaderEditor上で見た目反映されないし、マイナスが入るとおかしくなるのが難点。
以下のリンクをコピー → お手元のShaderEditor上でペーストすれば使える(はず)
http://paste.amplify.pt/view/raw/4482a0bf
※追記
Multiplyに同じ値を2つ入れるとQuadraticInに、3つ入れるとCubicInになるのでそっちのが便利かも。
ポリゴン内にポリゴンをマスキングしたい!
ステンシル(Stencil)を使う。詳しくは以下など
トラブルシューティング
Property (_MainTex等) already exists. Use SetTexture instead~の警告が出る

ShaderTypeをUI/Defaultに選択した場合、_MainTexはSprite用に引っ張る必要がある。
“Template Paramator”のノードでParamaterでSpriteTextureをを指定して、TextureSampleにつなげばOK。
参考:Unity Products:Amplify Shader Editor/Template Parameter
参考:Amplify Shader Editor Problem with Sprite and UI Shader Types: Property (_MainTex) already exists. Use SetTexture instead – Real Time VFX
Property (_ZWrite等) already exists. Use SetTexture instead~の警告が出る
_ZWriteをfloatで参照させている場合など。AttributesでIntRangeを指定した場合はチェックをオフに
Shader warning in ‘〇〇〇’: pow(f, e) will not work for negative f ~の警告が出る
Fresnelを使っているのであれば、SafePowerにチェックを入れれば解決。
その他リンク集
参考にさせて頂いております!めちゃ助かる
